
Although getting data into R is essential, getting data out of R can be just as important. Whether you need to export data or analytic results simply to store, share, or feed into another system it is generally a straight forward process. This section will cover how to export data to text files, Excel files (along with some additional formatting capabilities), and save to R data objects. In addition to the the commonly used base R functions to perform data importing, I will also cover functions from the popular readr and xlsx packages along with a lesser known but useful r2excel package for Excel formatting.
As mentioned in the importing data section, text files are a popular way to hold and exchange tabular data as almost any data application supports exporting data to the .csv (or other text file) formats. Consequently, exporting data to a text file is a pretty standard operation. Plus, since you’ve already learned how to import text files you pretty much have the basics required to write to text files…we just use a slightly different naming convention.
Similar to the examples provided in the importing text files section, the two main groups of functions that I will demonstrate to write to text files include base R functions and readr package functions.
write.table() is the multipurpose work-horse function in base R for exporting data. The functions write.csv() and write.delim() are special cases of write.table() in which the defaults have been adjusted for efficiency. To illustrate these functions let’s work with a data frame that we wish to export to a CSV file in our working directory.
df <- data.frame(var1 = c(10, 25, 8),
                 var2 = c("beer", "wine", "cheese"),
                 var3 = c(TRUE, TRUE, FALSE),
                 row.names = c("billy", "bob", "thornton"))

df
##          var1   var2  var3
## billy      10   beer  TRUE
## bob        25   wine  TRUE
## thornton    8 cheese FALSE
To export df to a .csv file we can use write.csv(). Additional arguments allow you to exclude row and column names, specify what to use for missing values, add or remove quotations around character strings, etc.
# write to a csv file
write.csv(df, file = "export_csv")

# write to a csv and save in a different directory
write.csv(df, file = "folder/subfolder/subsubfolder/export_csv")

# write to a csv file with added arguments
write.csv(df, file = "export_csv", row.names = FALSE, na = "MISSING!")
In addition to .csv files, we can also write to other text files using write.table and write.delim().
# write to a tab delimited text files
write.delim(df, file = "export_txt")

# provides same results as read.delim
write.table(df, file = "export_txt", sep="\t")
The readr package uses write functions similar to base R. However, readr write functions are about twice as fast and they do not write row names. One thing to note, where base R write functions use the file = argument, readr write functions use path =.
library(readr)

# write to a csv file
write_csv(df, path = "export_csv2")

# write to a csv and save in a different directory
write_csv(df, path = "folder/subfolder/subsubfolder/export_csv2")

# write to a csv file without column names
write_csv(df, path = "export_csv2", col_names = FALSE)

# write to a txt file without column names
write_delim(df, path = "export_txt2", col_names = FALSE)

# write to a csv with UTF-8 Byte order mark to indicate to Excel the csv is UTF-8 encoded
write_excel_csv(df, path = "export_csv2", col_names = FALSE)
mtcars to a .csv file on your computer.mtcars to a .csv file in that subfolder.iris to a UTF-8 encoded .csv file with write_excel_csv.USArrests as a tab separated file.As previously mentioned, many organizations still rely on Excel to hold and share data so exporting to Excel is a useful bit of knowledge. And rather than saving to a .csv file to send to a co-worker who wants to work in Excel, its more efficient to just save R outputs directly to an Excel workbook. Here I’ll cover how to write and format Excel files with:
Although readr and its brother readxl do not provide direct exportation to Excel files, the readr function does provide a simple function to encode a .csv file as UTF-8 encoded, which will be recognized by Excel:
library(readr)

write_excel_csv(df, path = "df", col_names = FALSE)
The xlsx package provides exporting and formatting capabibilities for Excel 2007 and Excel 97/2000/XP/2003 file formats. Although these file formats are a bit outdated this package provides some nice formatting options. Saving a data frame to a .xlsx file is as easy as saving to a .csv file:
library(xlsx)

# write to a .xlsx file
write.xlsx(df, file = "output_example.xlsx")

# write to a .xlsx file without row names
write.xlsx(df, file = "output_example.xlsx", row.names = FALSE)
In some cases you may wish to create a .xlsx file that contains multiple data frames. In this you can just create an empty workbook and save the data frames on seperate worksheets within the same workbook:
# create empty workbook
multiple_df <- createWorkbook()

# create worksheets within workbook
car_df <- createSheet(wb = multiple_df, sheetName = "Cars")
iris_df <- createSheet(wb = multiple_df, sheetName = "Iris")

# add data frames to worksheets; for this example I use the
# built in mtcars and iris data frames
addDataFrame(x = mtcars, sheet = car_df)
addDataFrame(x = iris, sheet = iris_df)

# save as a .xlsx file
saveWorkbook(multiple_df, file = "output_example_2.xlsx")
By default this saves the row and column names but this can be adjusted by adding col.names = FALSE and/or row.names = FALSE to the addDataFrame() function. There is also the ability to do some formatting with the xlsx package. The following provides several examples of how you can edit titles, subtitles, borders, column width, etc.1 Although at first glance this can appear tedious for simple Excel editing, the real benefits present themselves when you integrate this editing into automated analyses.
# create new workbook
wb <- createWorkbook()
#--------------------
# DEFINE CELL STYLES
#--------------------
# title and subtitle styles
title_style <- CellStyle(wb) +
Font(wb, heightInPoints = 16,
color = "blue",
isBold = TRUE,
underline = 1)
subtitle_style <- CellStyle(wb) +
Font(wb, heightInPoints = 14,
isItalic = TRUE,
isBold = FALSE)
# data table styles
rowname_style <- CellStyle(wb) +
Font(wb, isBold = TRUE)
colname_style <- CellStyle(wb) +
Font(wb, isBold = TRUE) +
Alignment(wrapText = TRUE, horizontal = "ALIGN_CENTER") +
Border(color = "black",
position = c("TOP", "BOTTOM"),
pen = c("BORDER_THIN", "BORDER_THICK"))
#-------------------------
# CREATE & EDIT WORKSHEET
#-------------------------
# create worksheet
Cars <- createSheet(wb, sheetName = "Cars")
# helper function to add titles
xlsx.addTitle <- function(sheet, rowIndex, title, titleStyle) {
rows <- createRow(sheet, rowIndex = rowIndex)
sheetTitle <- createCell(rows, colIndex = 1)
setCellValue(sheetTitle[[1,1]], title)
setCellStyle(sheetTitle[[1,1]], titleStyle)
}
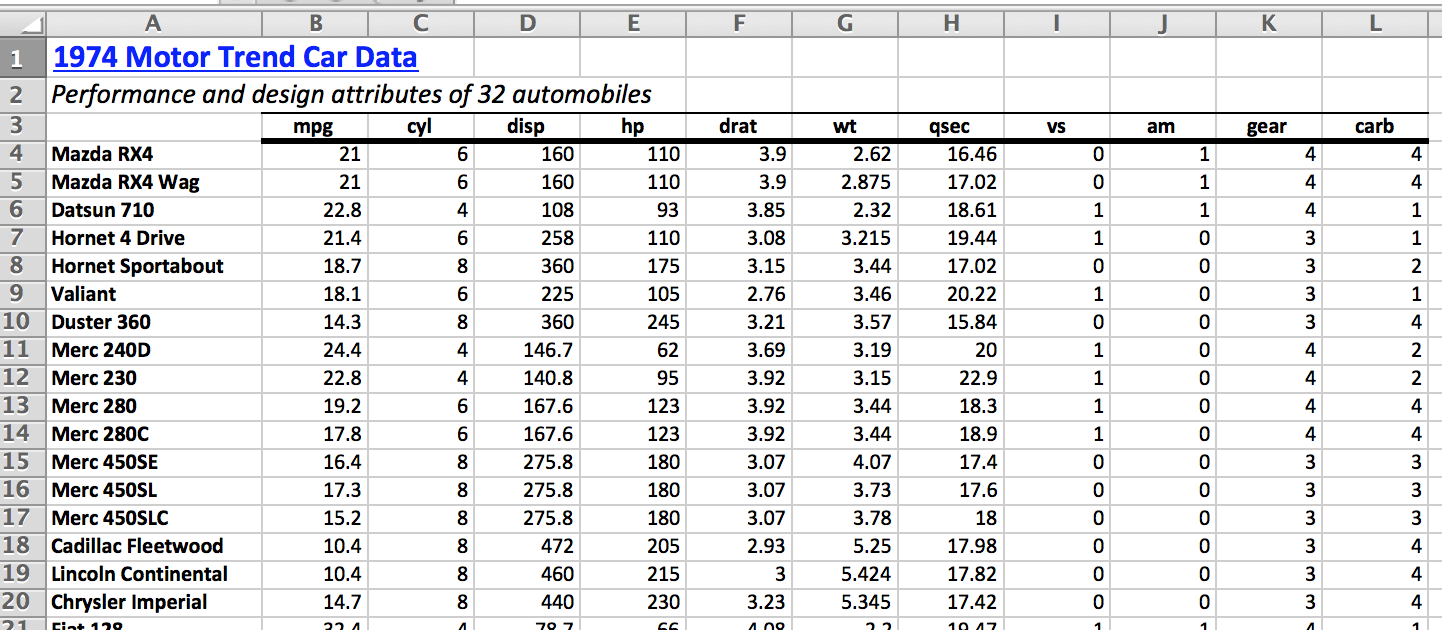
# add title and sub title to worksheet
xlsx.addTitle(sheet = Cars, rowIndex = 1,
title = "1974 Motor Trend Car Data",
titleStyle = title_style)
xlsx.addTitle(sheet = Cars, rowIndex = 2,
title = "Performance and design attributes of 32 automobiles",
titleStyle = subtitle_style)
# add data frame to worksheet
addDataFrame(mtcars, sheet = Cars, startRow = 3, startColumn = 1,
colnamesStyle = colname_style,
rownamesStyle = rowname_style)
# change row name column width
setColumnWidth(sheet = Cars, colIndex = 1, colWidth = 18)
# save workbook
saveWorkbook(wb, file = "output_example_3.xlsx")
Although Formatting Excel files using the xlsx package is possible, the last section illustrated that it is a bit cumbersome (plus xlsx only creates and formats Excel 2007 or less formats). For this reason, A. Kassambara created the r2excel package which depends on the xlsx package but provides easy to use functions for Excel formatting. The following provides a simple example but you can find many additional formatting functions here
# install.packages("devtools")
devtools::install_github("kassambara/r2excel")
library(r2excel)
# create new workbook
wb <- createWorkbook()
# create worksheet
Casualties <- createSheet(wb, sheetName = "Casualties")
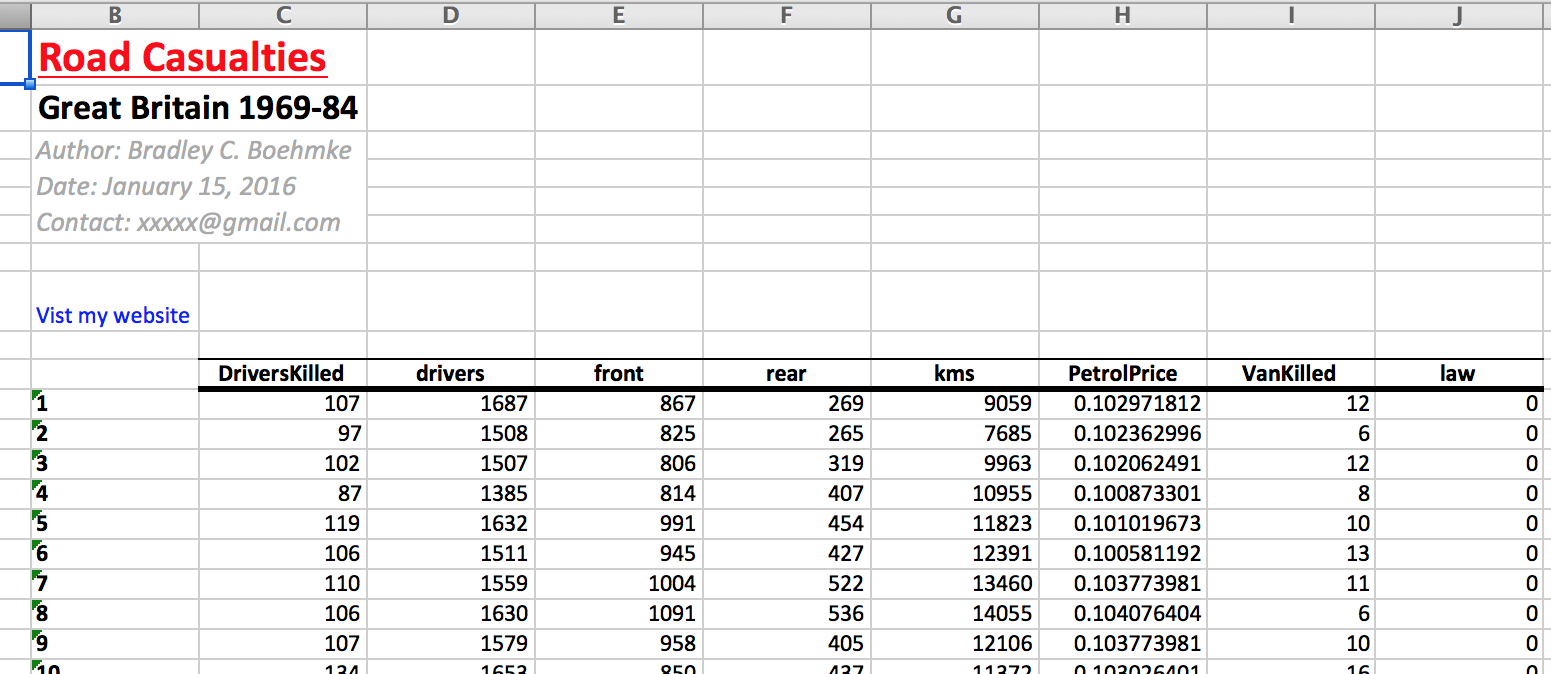
# add title
xlsx.addHeader(wb, sheet = Casualties,
value = "Road Casualties",
level = 1,
color = "red",
underline = 1)
# add subtitle
xlsx.addHeader(wb, sheet = Casualties,
value = "Great Britain 1969-84",
level = 2,
color = "black")
# add author information
author = paste("Author: Bradley C. Boehmke \n",
"Date: January 15, 2016 \n",
"Contact: xxxxx@gmail.com", sep = "")
xlsx.addParagraph(wb, sheet = Casualties,
value = author,
isItalic = TRUE,
colSpan = 2,
rowSpan = 4,
fontColor = "darkgray",
fontSize = 14)
# add hyperlink
xlsx.addHyperlink(wb, sheet = Casualties,
address = "http://bradleyboehmke.github.io/",
friendlyName = "Vist my website", fontSize = 12)
xlsx.addLineBreak(sheet = Casualties, 1)
# add data frame to worksheet, I'm using the built in
# Seatbelt data which you can view at data(Seatbelt)
xlsx.addTable(wb, sheet = Casualties, data = Seatbelts, startCol = 2)
# save the workbook to an Excel file
saveWorkbook(wb, file = "output_example_4.xlsx")
mtcars to a UTF-8 encoded .csv file with write_excel_csv.mtcars and iris into the same Excel workbook but on separate spreadsheets.Sometimes you may need to save data or other R objects outside of your workspace. You may want to share R data/objects with co-workers, transfer between projects or computers, or simply archive them. There are three primary ways that people tend to save R data/objects: as .RData, .rda, or as .rds files.
.rda is just short for .RData, therefore, these file extensions represent the same underlying object type. You use the .rda or .RData file types when you want to save several, or all, objects and functions that exist in your global environment. On the other hand, if you only want to save a single R object such as a data frame, function, or statistical model results its best to use .rds file type. You can use .rda or .RData to save a single object but the benefit of .rds is it only saves a representation of the object and not the name whereas .rda and .RData save the both the object and its name. As a result, with .rds the saved object can be loaded into a named object within R that is different from the name it had when originally saved. The following illustrates how you save R objects with each type.
# save() can be used to save multiple objects in you global environment,
# in this case I save two objects to a .RData file
x <- stats::runif(20)
y <- list(a = 1, b = TRUE, c = "oops")
save(x, y, file = "xy.RData")

# save.image() is just a short-cut for ‘save my current workspace’,
# i.e. all objects in your global environment
save.image()

# write rds file readr
readr::write_rds(x, "x.rds")

# save a single object to file
saveRDS(x, "x.rds")

# restore it under a different name
x2 <- readRDS("x.rds")
identical(x, x2)
[1] TRUE
USArrests as a export1.rds file.USArrests, mtcars, and iris as a single export2.RData file.The following provides additional resources for exporting data:
This example was derived from STHDA. Additional options, such as adding plot outputs can be found at STHDA and also in the XML and Web Technologies for Data Sciences with R book. ↩