
Interactive execution mode for R Markdown documents.
An R Notebook is an R Markdown document that allows for independent and interactive execution of the code chunks. This allows you to visually assess the output as you develop your R Markdown document without having to knit the entire document to see the output. It is important to note that the R Notebook functionality is currently available only in the RStudio Preview Release so if you want to have this capability you need to download the latest preview release.
R Notebooks can be thought of as a unique execution mode for R Markdown documents as any R Markdown document can be used as a notebook, and all R Notebooks can be rendered to other R Markdown document types. The interactive capabilities of the notebook mode makes it extremely useful for writing R Markdown documents and iterating on code.
Once you have installed the RStudio preview version creating an R Notebook is similar to creating an R Markdown document - you’ll notice a new option for creating an R Notebook. When you create a new R Notebook the primary differece you will notice at first is the YAML which will look like:
---
title: "R Notebook"
output: html_notebook
---
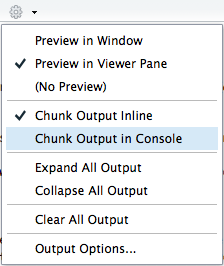
The default notebook mode allows inline output on all R Markdown documents. If you prefer to use the traditional console method of interaction, you can disable notebook mode by clicking the gear in the editor toolbar and choosing Chunk Output in Console. You can also toggle between previewing the document in the Viewer Pane versus in a Window.
Writing an R Notebook document is no different than writing an R Markdown document. The text and code chunk syntax does not differ from what you learned in the R Markdown tutorial. The primary difference is in the interativeness of an R Notebook. Primarily that when executing chunks in an R Markdown document, all the code is sent to the console at once, but in an R Notebook, only one line at a time is sent. This allows execution to stop if a line raises an error.
There are couple options for executing code chunks. You can execute code chunks individually by:
You can also run all chunks in your document by:
When a code chunk is waiting to be executed, you’ll notice a progress meter that appears to the left of the code chunk plus there will be a status in the editor’s status bar indicating the number of chunks remaining to be executed. You can click on this meter at any time to jump to the currently executing chunk.
When a notebook .Rmd is saved, an .nb.html file is created alongside it. This file is a self-contained HTML file which contains all current code chunks (collapsable/expandable) and their respective outputs. You can view this .nb.html file directly in any browser along with sharing it with others who can also view it in any browser.
Ordinary R Markdown documents are “knit”, but notebooks are “previewed”. So by default, when you select the preview option in the editor toolbar your document will be previewed in the Viewer Pane. You can preview your document in a window by selecting the desired option in the gear in the editor toolbar.

When you are ready to publish the document, you can share the .nb.html directly, or render it to a publication format by knitting the document to the desired format.

Learn more about R Notebook at RStudio’s tutorial page.